Monday, November 25, 2013

52 in 52 #19 - Chicken Noodle Soup

I have been looking for a recipe for a decent chicken noodle soup forever.  All of the ones that I have tried so far have either had way too much salt, not enough seasoning at all, noodles that fall apart, or something else that made you think that you wasted an entire evening cooking something that you just want to throw away.  Since I have been having some luck with Pinterest recipes lately and since it was perfect soup weather today in DFW, I figured that I would try out one of the popular recipes that I found this afternoon. 

Thanks to wanting to make a chicken pot pie at some point during this month, I already had the ingredients for this recipe on hand.  I also took a look through the recipe to ensure that there weren't any steps that made me rethink the author's sanity.  This is a step that I used to not perform, and then I was burned by several awful recipes and decided that I had to start previewing the recipes before cooking.  This recipe did not seem to have any out of the ordinary steps, so I figured that we were good to go. 

This recipe is very good and was an excellent end to a cold, rainy day here in the Metroplex.  My husband said that the seasoning was lacking something but I think that he is looking for something that he is never going to find with a recipe for chicken noodle soup because my kids and I thought that it was great.  I did make a few minor changes to the recipe.  The original is here and you can find mine detailed below. 

Homemade Chicken Noodle Soup
Prep time: 15 mins
Cook time: 1 hour 30 mins

Ingredients:
2 whole chicken breasts
1 medium to large onion, chopped
3 tbsp. chopped garlic
2 tbsp. olive oil
1 lb carrots, chopped
1 bunch celery, chopped
1 bay leaf
1 tbsp. chopped, dried parsley
1/2 tsp thyme
1 tsp dried basil
1 tbsp. salt
1 tsp black pepper
water
16 oz egg noodles

Place chopped garlic and onion in large stockpot with olive oil and sauté over medium heat until tender.  Add carrots and celery and continue to sauté for 2-3 minutes.  Add herbs, salt, pepper and chicken breasts to pot and cover with 8 cups of water.  Bring the mixture to a boil and immediately reduce to a simmer.  Continue to simmer for one hour.  After one hour, remove the chicken and shred finely with two forks.  Add at least 1 tsp more salt at this time, depending on how salty you like your soup.  Add a little more than you care for, because you have yet to boil the pasta and add additional water and that will lessen the saltiness of a soup.  Add the noodles, raise heat and boil for 7 minutes.  After 7 minutes, add chicken back into mixture and add at least 2 cups more water.  I had to add another 5 cups to get the amount of soup that I was looking for and to even out the liquid to noodles mixture.  Ensure that water that you are adding is hot or else you will have to spend another 5 minutes heating mixture again to avoid hot and cold spots in your soup.  Season again and serve warm. 

Enjoy!


Sunday, November 24, 2013

52 in 52 #18 - Pioneer Woman Meatloaf

So, I'm going to be completely and totally honest here... I am not a meatloaf fan.  I never have been and probably never will be the biggest fan of it.  My mother didn't care for it and thus didn't serve it a lot, so I never really got the chance growing up to become accustomed to it.  Now that I am a grown up, it doesn't make my meal plan a lot, even though my husband loves it.  I resolved to change that this month because I know that he loves it and doesn't get to have it a lot.  Plus, I saw that the Pioneer Woman has a recipe for it and I figured that her recipe was bound to be amazing since I have yet to try a recipe by her that wasn't completely awesome. 

This recipe definitely did not disappoint.  I mean, it's covered in bacon... how bad could it really be?  Everything is better with cheese and bacon, right?  If you aren't saying "Right?" right now, we can't be friends anymore...

This meatloaf is moist and flavorful, and the sauce for the top is amazing.  I made a small modification because we don't have Tabasco in our house, but I would imagine that even if you made it exactly the way that it called for in the recipe that it would be amazing.  I will say that I am stating our cook time that it took in our oven.  Her recipe stated that you should cook the meatloaf for 45 ish minutes and after that time our loaf was no where near done.  We used a probe thermometer to ensure that it was cooked through and ours took roughly an hour and a half to cook through.  Keep an eye on yours and ensure that it is fully cooked before consuming.  Pink in the middle is not acceptable for this recipe. 

Definitely make this recipe if you or anyone you know is a meatloaf fan and they will think that you are awesome! 

Simple Meatloaf
Prep time: 15 mins
Cook time: 1 hour 30 minutes

Ingredients:
2 lbs ground beef
1 cup shredded Parmesan cheese
1/3 cup fresh minced Parsley
4 beaten eggs
6 slices white bread
1 cup milk
3 tsp salt
pepper to taste
1 tbsp. seasoning salt
10 slices thin bacon
1 and 1/2 cups ketchup
1/3 cup brown sugar
1 tsp. ground mustard
Sriracha to taste

Instructions:
Preheat oven to 350 degrees.  Place six slices of white bread in a bowl and cover with milk.  Allow to soak for a few minutes.  This part is crucial for the texture.  Bread crumbs are not an acceptable substitution in this recipe. 

Mix eggs, beef, cheese, salt, pepper, seasoning salt in a bowl and mix thoroughly.  Crumble bread and milk into this mixture and completely combine.  As odd as this sounds, your hands are the best tools to combine a meatloaf's ingredients together. 

Once your ingredients are completely combined, form into a loaf shape on a broiler pan.  Ensure that you have another pan underneath to catch drippings.  For your sanity, I would cover that bottom pan with aluminum foil.  This will allow for easy clean up when you are in a food coma after consuming this amazing dish. 

Once your loaf is formed, top with bacon slices.  Combine ketchup, brown sugar, mustard, and Tabasco.  Pour 1/3 of the sauce over the bacon slices and spread evenly.  Bake in oven for 1 hour and 15 minutes.  Remove from the oven, top with 1/2 of the remaining sauce and continue baking for 15 minutes.  Check the temperature.  We looked for 165 degrees.  You can technically cook it shy of that temperature but you are safe at 165.   Note:  I am using a picture from the Pioneer Woman's own recipe post.  In all the excitement of dinner finally being done with three starving kids, I forgot to take a 'final' photo.  This will not be the last time that we will make this so I will update with a 'real' picture of mine when we make it again. 

Serve with remaining sauce and your choice of side dishes.  We served it with the Crockpot Macaroni and Cheese

Enjoy! 


52 in 52 #17 - Crockpot macaroni and cheese

I love my crockpot(s).  I love macaroni and cheese.  So when I saw this recipe for a crockpot macaroni and cheese, my heart was overjoyed.  You mean, I wouldn't have to stand over the stove and cook a roux, cook noodles and then wait for all of this to bake?  I could really just par-cook noodles and then throw all this stuff in the crockpot and 4 hours later like magic it would be done?  This is like modern day magic! 

I was anxious to test this out as Thanksgiving approaches.  In our family's Thanksgiving celebration, we are in charge of the side dishes.  I am always on the look out for a good macaroni and cheese recipe.  While this recipe that I blogged about the other day was delicious, I am not going to be home for the crucial cooking time for that recipe and was hoping to find something that could just hang out in a crock pot and cook itself. 

I will say this about this recipe... it is cheesey.  For someone who likes a macaroni and cheese that tastes extra cheesey, then this recipe is totally for you.  For us, it was too cheesey.  It tasted, honestly, like we could have half-ed the amount of cheese in the recipe and been completely fine.  And I will admit that I even added more noodles than I should have because it seemed like the balance was already off from the get go.  The taste was good and it would honestly probably work with half of the Velveeta, or half of the Colby and jack cheese(s).  Also, for all of you readers that have the larger circular crock pots or crockpots that heat to a hotter temperature, you might want to cut the time back as well.  I was using our larger circular crock pot and it boils on low some how, so I should have also cut the cook time back by at least 30 minutes or used our smaller crock pot which actually is a low temperature when set to low.   

Even though the finished product was not what I intended, I will definitely be making this again and will update with the changes that I make to the recipe.  I am bound and determined that I will find a simple but delicious macaroni and cheese recipe that I can share with you all.  If you have one that you think would make the cut, please email me! 

Crockpot Macaroni and cheese

Prep time: 15 mins
Cook time: 4 hours

Ingredients:
2 cups cooked macaroni noodles
16 ounces Colby cheese, cubed
16 ounces Monterrey Jack cheese, cubed
16 ounces Velveeta cheese, cubed
1 stick of butter, cubed
salt and pepper to taste
2 cups whole milk

Instructions:
Boil macaroni noodles for 4 minutes, tops.  It is going to seem very odd to only cook them for such a short time, but believe me, if you cook them any longer they will be mushy and gross by the time your macaroni and cheese is ready to serve. 

Layer macaroni, cheeses, butter, salt and pepper together starting and ending with your cooked pasta.  Once the layers are complete, pour milk over the top. 

Cover and cook on low for 4 hours.  Stir only twice - once halfway through and once at the end.  Any more stirring than that and you will risk breaking down your noodles and turning the whole thing to mush. 

Beware that the edges will get very dark brown.  This will be similar to baked macaroni and cheese.  Ours did not get as brown as I thought that it would, but rest assured that it will not burn and those pieces are acceptable to be stirred in or eaten separately by the person cooking. 

Enjoy! 

Sunday, November 17, 2013

52 in 52 #16 - Buckeye Bites

Sugar and peanut butter held together by a pretzel and dipped in chocolate.  Oh it sounds awful!  How could anyone make such a gross recipe?  Totally kidding... this recipe, honestly, had to have been invented by a woman either PMS-ing or pregnant. 

These are nothing short of amazing.  The creamy peanut butter and sugar and the awesome hard candy shell really work together to make these irresistible.  I have made them several different times and have yet to find anyone, besides my toddlers, who hate them.  We are lucky because our toddlers are not into these - more for us!  The creamy, peanut-buttery, pretzel-y, chocolate-y goodness is something that should be shared with others but with a secret stash for yourself to eat after the kids go to bed! 

Buckeye Bites
Prep time: 10 mins
Freeze time: 1 hour

Ingredients:
1 cup creamy peanut butter
2 tbsp. softened unsalted butter
1/2 cup powdered sugar
3/4 cup brown sugar
 pretzels
chocolate melts

Instructions: 
Line a large baking sheet with aluminum foil.  Cream together butter and peanut butter.  I have used a stand mixer and it seems to incorporate things easier, quicker and you don't feel like you need to stop and have a rest for your arm halfway through.  Mix in sugars.  Dough will be very thick and very sticky.  At this point, I refrigerate the dough for at least 10 minutes to make it significantly less sticky.  Roll the dough into balls and top a pretzel with each ball.  (We do balls about the size of 2 marbles, but you can do more if you would like your bites to be thicker, smaller if you would like them to be thinner.)  When you find that the dough is too sticky to handle, simply put it back in the refrigerator for a few minutes.  Top each ball with a second pretzel with the sides lined up to the bottom pretzel.  Once all of your dough is balled up and in a 'pretzel sandwich', place those pretzel sandwiches in the freezer for at least 20 minutes, if not longer.  Melt the chocolate in the microwave or over a double boiler.  Dip half of each pretzel sandwich in the chocolate and place back on your pan.  Once all pretzels are dipped, place in the fridge for 15 minutes. 

Consume with caution - these are dangerously good!

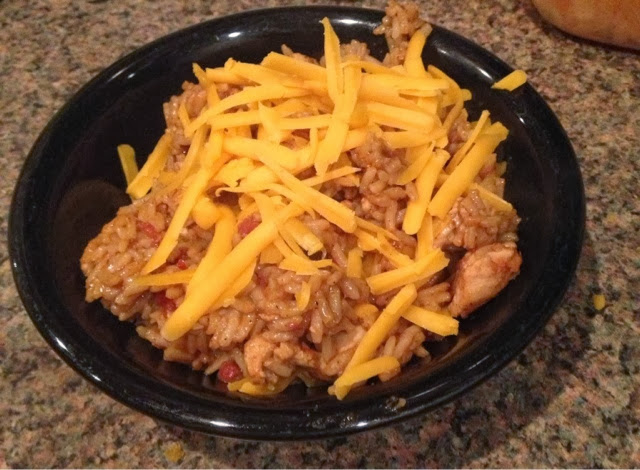
52 in 52 #15 - Southwest Chicken and Rice Casserole

I promise I am going to blog about something other than recipes... eventually.  I have been in the zone lately making recipes that I find from Pinterest, it seems.  And (knock on wood) they have been mostly positive experiences. 

Next up on the list is Southwest Chicken and Rice Casserole.  Let me be honest here... I was originally annoyed by this pin because it is just a picture when you click on it.  I don't understand why people do this for a recipe.  Take me to someone's blog or website that has made the recipe and can give clear, descriptive instructions.  I don't want to see a picture with your less than 100 words of description/recipe.

With that being said, I still took the chance and it turned out great.  Our latest version of taco seasoning that we made is a little bit more spicy than I care for, but it made this dish very flavorful. 

Southwest Chicken and Rice Casserole
Prep time: 15 mins
Cook time: 25 mins

Ingredients
2 large chicken breasts
2 cups instant rice - we used brown
3 tbsp. homemade taco seasoning or 1 packet
1 can tomatoes and green chiles
1 1/2 cups water
grated cheese

Instructions:
Cut chicken up into bite sized pieces.  Add water, taco seasoning and tomatoes and green chiles.  Heat until boiling.  Add rice and stir together.  This is where we differ from the recipe.  We heated our mixture to boiling again after the rice was added, then immediately covered and moved the temperature down to low on our stove top.  Once water is absorbed, stir completely to combine and top with shredded cheese. 

We served ours in a bowl and it was amazing!  It has great flavor and is super easy to make.  The cheese melts and makes it creamy and delicious! 

Enjoy!


Saturday, November 16, 2013

52 in 52 #14 - Persimmon Cookies with an orange glaze

A few weeks ago we got this mysterious orange fruit in our Bountiful Baskets haul.  While everyone is picking up their food, it is difficult to talk to people about what you are getting because it is mildly chaotic, so I just figured that I would look it up at home.  Lo and behold... a persimmon.  Before that day, I can't say with confidence that I knew what a persimmon even was. 

I have been trying to use everything that we get out of our baskets and let less go to waste, so I knew that I wanted to use them in something.  A quick search on Pinterest and voila - persimmon cookies!  I told a friend at work about them and he instructed me to freeze them because they are supposedly better after a first freeze and since ours would have been harvested before that then they probably weren't technically ripe and awesome tasting yet.  Into the freezer they went... 

My first batch of cookies tasted awesome but I knew that the texture could be better so I decided to try out pureeing the fruit and see how that did.  Once out of the freezer they defrost very quickly and the fruit turns kind of mushy.  If you are not going to use them in cooking, and want more of a raw fruit experience, I would not freeze them.  However, for this recipe it was a great idea!  Give it a try! 

Persimmon Cookies with Orange Glaze
Prep time: 15 mins
Cook time: 12 per batch

Cookie ingredients:
2 cups all-purpose flour
1 tsp baking soda
1/2 tsp salt
1 tsp cinnamon
1/2 tsp cloves
1/2 tsp freshly ground nutmeg
1/2 cup unsalted softened butter
1 cup sugar
1 cup persimmon pulp (from 2-3 persimmons)
1 large egg
1 tsp vanilla

Orange glaze:
2 cups confectioners' sugar
1/4 cup fresh orange juice - we used at least 1/3 cup if not more
zest from oranges that you are juicing

Preheat oven to 350 degrees.

Whisk together the flour, baking soda, salt and spices. Set aside.

Cream the butter with the sugar. Puree the persimmons and beat in persimmon pulp, egg, and vanilla.

Slowly add in the flour mixture until everything is combined.

I use a small ice cream scoop for similarly sized portions of dough.  Bake for approximately 12-14 minutes or until cookies are brown around the edges and set. They will still look a little under done, but that is perfect!  Let cool on baking sheets for five minutes and then remove to a wire rack to cool completely.

To make the orange glaze, combine the confectioners' sugar, orange juice, and zest together. Whisk until smooth. Spoon glaze over each cookie.  Set cookies back on wire rack for glaze to harden.

These cookies have an amazing cake-y texture and the orange glaze really makes them special.  We love a really orange flavor in our glaze so cut back the juice and zest if you do not love as much orange flavor. 

Enjoy!

Tuesday, November 12, 2013

52 in 52 #13 - Extra cheesey macaroni and cheese

Honestly, does the Pioneer Woman make anything that isn't awesome?  I should have known when I went in search of a macaroni and cheese recipe that I would find one that was amazing.  Let me back up...

Almost anyone that you cooks seems to believe that one of the easiest things that you can cook is macaroni and cheese.  I am here to tell you that I think that is wrong.  I am a relatively decent cook most days, and I have royally screwed up more macaroni and cheese dishes than I care to admit.  I, however, was bound and determined to find one that was not a complete disaster. 

Back to the Pioneer Woman... we have made one of her awesome recipes before and I would be willing to bet that she is capable of coming up with a recipe that isn't amazing.  She loves butter and cheese as much as the next guy, and how can anything be bad with butter and cheese?  This macaroni and cheese was creamy and cheesey and amazing. 

Extra cheesey macaroni and cheese

Prep time: 25 mins
Cook time: 20-25 mins

4 cups dried macaroni noodles
4 tbsp. butter
1/4 cup flour
2 1/2 cups whole milk
2 tsp dry mustard
1 whole egg
1 pound cheese
salt & pepper to taste

Preheat oven to 350 degrees and grease a 2 qt casserole dish

Cook macaroni noodles until very al dente.  I cook mine roughly 5 minutes.  Remember they will continue to cook in the oven. 

Melt butter in a large saucepan.  Sprinkle in flour.  Cook mixture for 5 minutes, whisking constantly.  Be careful to not allow mixture to get too brown. 

After 5 minutes, add milk and dry mustard.  Continue to whisk and cook for another 5 minutes.  Mixture will be smooth and thick.  Turn heat to low after 5 minutes. 

Remove 1/4 cup of mixture and whisk vigorously with the beaten egg.  Add egg into saucepan and continue to whisk vigorously until fully combined and smooth.  Mixture will become very thick. 

Remove from heat and add all but 1/2 cup of cheese.  Stir until melted.  Season generously with salt and pepper. 

Add noodles and stir well to combine. 

Spoon into greased baking dish and top with remaining cheese.  Bake uncovered for 20-25 minutes.  Cheese on top will be melted and dish will be bubbly on the sides. 

Enjoy!