So on the menu for tonight's dinner was:
stuffed chicken breasts with broccoli & cheese
twice baked potato casserole (Thanks Jim and Traci for the inspiration!)
corn muffins
We were rockin' and rollin' with the cooking in the kitchen. The times to cook things were lining up, and all of the dishes were coming together really well. I had not originally planned on cooking corn muffins but they looked good when I was reviewing our items from the pantry. As I was scooping the corn muffin mix into the muffin tins I was like holy jeez I should add some of our freshly picked jalapenos to some of this batter for mine and Corry's muffins.
I quickly scooped out the seeds and chopped them up into small bits, scraped them into the bowl and scooped the remaining muffins into the tin. I was moving the tin over by the oven to get in line to be cooked in roughly 10 minutes and something in my eye started itching. Without even thinking about the fact that I had not yet washed my hands I moved my fingers up and itched the corner of my eyelid.
HOLY JEEZ!!! I have had a lot of bad ideas in my life, but they all suddenly pale in comparison to the utter horror and stabbing red hot poker-like pain that was radiating from my right eye. I instantly freak out because I am wearing contacts and I know from a million years in science class that all a contact lens does is hold the offensive liquid closer to your eyeball. I'm screaming for my husband (where is the camera to be recording this for YouTube when you need it?) and luckily he comes to help me. I get my contact out, rinse out my eye for what seems like years, and changed into my glasses. I had always heard don't go to the bathroom or rub your face until you wash your hands after cutting hot peppers like that but have never experienced it until tonight.
It has been more than 30 minutes since I stopped rinsing my eye and it still feels like I have an awful sunburn on the outside and inside of my eye. Please God tell me this is going to get better...
On the bright side, we had an excellent meal despite the burned eye situation.
Showing posts with label cooking. Show all posts
Showing posts with label cooking. Show all posts
Monday, July 15, 2013

Wednesday, February 13, 2013
Freezer Meal: Baked Ziti
On tap for dinner tonight is one of my favorite freezer meals - baked ziti. I always wanted a good baked pasta recipe and looked far and wide on the Internet for something that wasn't gross and didn't require an Italian grandmother. We didn't make a lot of complicated Italian dishes growing up so I had no knowledge base to build upon for this genre of food.
When I was pregnant with Isabella, I heard that it was helpful to have some meals already pre-made in the freezer. During those trying newborn days, apparently it is amazing to just have a few (dozen) meals left to your disposal in the freezer that you can just defrost and cook in the oven. Armed with this knowledge I scoured the Internet in search of recipes that I could try. My husband and I tend to eat the same types of food and so a lot of the recipes that I found were quickly dismissed into the "not willing to try" pile, but I did find a few recipes that sounded interesting.
I made them all one week day with my mother's help and lo and behold: amazing! The meals were made for us and only required a few tweaks which was another helpful thing. I adapted this recipe from this blogger and have made a version of it like 900 times more simple if you aren't totally in love with the idea of making your own sauce. Don't get me wrong, I love making my own spaghetti sauce. It's SO much better than anything that you can buy in the jar and relatively easy depending upon the recipe that you are using. However, there are times when I just want to be able to cook and be done in less than 2 hours, which is when this recipe comes in handy.
This recipe will make two 8x8 or 9x9 pans. I usually make one for dinner (with leftovers for tomorrow's lunch) and freeze one before baking. I simply line the pan with aluminum foil, pour in the ingredients, and freeze. Once the casserole is frozen solid you can remove the foil from the pan. I always wrap at least one more layer of foil around the food and label with the food, the date, and heating instructions that way I don't have to search the archives to find out how to reheat.
Baked Ziti
1/2lb cottage cheese
8-10 ozs ricotta cheese
2 eggs
2 cups Parmesan cheese
1/2 cup onion, grated
28oz spaghetti sauce
1lb ziti or penne rigate
8oz mozzarella, shredded
1 1/2 lbs mild Italian sausage and ground beef
5 garlic cloves, chopped
1 cup milk
1 tsp cornstarch
salt & pepper to taste
Heat oven to 350 degrees. Bring water to boil and cook pasta until al dente - about 7 minutes. Drain the pasta and set aside. Mix cottage cheese, beaten eggs, & 1 cup Parmesan cheese together in a bowl and set aside.
Cook meat until brown and add in the onion and garlic. Continue to cook until the onion is translucent and softened. Add in your favorite spaghetti sauce and heat through. Season with salt and pepper, if necessary.
In a separate bowl, combine the cornstarch and milk. Pour it into the now-empty stockpot over medium heat. Simmer and cook until thickened - about 3-4 minutes. Remove from the heat and add the cottage cheese, egg and Parmesan mixture, 2 cups of the spaghetti sauce and 3/4 cup mozzarella. Combine. Add all of the pasta and stir to combine.
Split the pasta into 2 dishes and spread the remaining spaghetti sauce over the top. Sprinkle the remaining Mozzarella and Parmesan over the top of the dishes.
Bake covered with foil for 30 minutes and then uncovered for another 30 minutes. If frozen, thaw completely and follow normal cooking instructions.
This is my favorite baked pasta dish and surprisingly easy. It also reheats really well. You can substitute whatever ground meat you feel like for the sausage and the ground beef. We have used all sausage, all ground beef and a mixture of the two. I like the mixture because it yields different flavors. I also buy a spaghetti sauce with extra basil in it but you can definitely use your favorite one.
I hope you enjoy!!
-Sara
When I was pregnant with Isabella, I heard that it was helpful to have some meals already pre-made in the freezer. During those trying newborn days, apparently it is amazing to just have a few (dozen) meals left to your disposal in the freezer that you can just defrost and cook in the oven. Armed with this knowledge I scoured the Internet in search of recipes that I could try. My husband and I tend to eat the same types of food and so a lot of the recipes that I found were quickly dismissed into the "not willing to try" pile, but I did find a few recipes that sounded interesting.
I made them all one week day with my mother's help and lo and behold: amazing! The meals were made for us and only required a few tweaks which was another helpful thing. I adapted this recipe from this blogger and have made a version of it like 900 times more simple if you aren't totally in love with the idea of making your own sauce. Don't get me wrong, I love making my own spaghetti sauce. It's SO much better than anything that you can buy in the jar and relatively easy depending upon the recipe that you are using. However, there are times when I just want to be able to cook and be done in less than 2 hours, which is when this recipe comes in handy.
This recipe will make two 8x8 or 9x9 pans. I usually make one for dinner (with leftovers for tomorrow's lunch) and freeze one before baking. I simply line the pan with aluminum foil, pour in the ingredients, and freeze. Once the casserole is frozen solid you can remove the foil from the pan. I always wrap at least one more layer of foil around the food and label with the food, the date, and heating instructions that way I don't have to search the archives to find out how to reheat.
Baked Ziti
1/2lb cottage cheese
8-10 ozs ricotta cheese
2 eggs
2 cups Parmesan cheese
1/2 cup onion, grated
28oz spaghetti sauce
1lb ziti or penne rigate
8oz mozzarella, shredded
1 1/2 lbs mild Italian sausage and ground beef
5 garlic cloves, chopped
1 cup milk
1 tsp cornstarch
salt & pepper to taste
Heat oven to 350 degrees. Bring water to boil and cook pasta until al dente - about 7 minutes. Drain the pasta and set aside. Mix cottage cheese, beaten eggs, & 1 cup Parmesan cheese together in a bowl and set aside.
Cook meat until brown and add in the onion and garlic. Continue to cook until the onion is translucent and softened. Add in your favorite spaghetti sauce and heat through. Season with salt and pepper, if necessary.
In a separate bowl, combine the cornstarch and milk. Pour it into the now-empty stockpot over medium heat. Simmer and cook until thickened - about 3-4 minutes. Remove from the heat and add the cottage cheese, egg and Parmesan mixture, 2 cups of the spaghetti sauce and 3/4 cup mozzarella. Combine. Add all of the pasta and stir to combine.
Split the pasta into 2 dishes and spread the remaining spaghetti sauce over the top. Sprinkle the remaining Mozzarella and Parmesan over the top of the dishes.
Bake covered with foil for 30 minutes and then uncovered for another 30 minutes. If frozen, thaw completely and follow normal cooking instructions.
This is my favorite baked pasta dish and surprisingly easy. It also reheats really well. You can substitute whatever ground meat you feel like for the sausage and the ground beef. We have used all sausage, all ground beef and a mixture of the two. I like the mixture because it yields different flavors. I also buy a spaghetti sauce with extra basil in it but you can definitely use your favorite one.
I hope you enjoy!!
-Sara
Saturday, February 9, 2013
52 in 52 #4 - Baked Tacos
Pinterest project - 4
Pinterest projects to go - 48

Inspiration: http://www.onegoodthingbyjillee.com/2012/11/how-to-make-hard-taco-shells-in-your-ovenplus-a-recipe-for-baked-tacos.html
I love this woman. Well, I love her recipes. She is all the brain behind the taco seasoning that we have been using and that I have been craving for weeks. It's amazing! I love finding people like this 1) who cook, 2) who post their recipes online, and 3) who actually make GOOD food because I then feel like I can trust other recipes that she has posted on her blog. I feel this way also about my husband's girlfriend aka The Pioneer Woman. I have been burned by many people who post recipes on their blogs and obviously either don't cook or don't test the recipe and it turns out HORRIBLE.
Back to the recipe - it was awesome! I really liked the tacos better that didn't get overly full because then the shell stayed crispy in the oven but that's just a personal preference. I will admit that we did something with this recipe that I absolutely hate that people do and we changed it before we even made it once the correct way. We ONLY did this because we didn't have the proper amount of tomato sauce and there was no way that either one of us were leaving the house for 7 more ounces of tomato sauce. Instead we substituted a small can of enchilada sauce and it was awesome. I don't feel like it changed the integrity of the dish at all so I still will credit this woman for her amazing recipe.
Baked Tacos
Ingredients:
12 taco shells
1 can refried beans
2 lbs ground beef
15 ounces tomato sauce
2 - 3 tablespoons taco seasoning (Her homemade Taco Seasoning)
2 cups shredded Colby Jack cheese
Instructions:


Arrange taco shells in an oven safe dish. I used a 13x9 glass Pyrex dish.


This recipe received the stamp of approval from my husband and our two children. Her taco seasoning is very flavorful but not overly spicy and is easily tolerated by my two small children.
Pinterest projects to go - 48
Inspiration: http://www.onegoodthingbyjillee.com/2012/11/how-to-make-hard-taco-shells-in-your-ovenplus-a-recipe-for-baked-tacos.html
I love this woman. Well, I love her recipes. She is all the brain behind the taco seasoning that we have been using and that I have been craving for weeks. It's amazing! I love finding people like this 1) who cook, 2) who post their recipes online, and 3) who actually make GOOD food because I then feel like I can trust other recipes that she has posted on her blog. I feel this way also about my husband's girlfriend aka The Pioneer Woman. I have been burned by many people who post recipes on their blogs and obviously either don't cook or don't test the recipe and it turns out HORRIBLE.
Back to the recipe - it was awesome! I really liked the tacos better that didn't get overly full because then the shell stayed crispy in the oven but that's just a personal preference. I will admit that we did something with this recipe that I absolutely hate that people do and we changed it before we even made it once the correct way. We ONLY did this because we didn't have the proper amount of tomato sauce and there was no way that either one of us were leaving the house for 7 more ounces of tomato sauce. Instead we substituted a small can of enchilada sauce and it was awesome. I don't feel like it changed the integrity of the dish at all so I still will credit this woman for her amazing recipe.
Baked Tacos
Ingredients:
12 taco shells
1 can refried beans
2 lbs ground beef
15 ounces tomato sauce
2 - 3 tablespoons taco seasoning (Her homemade Taco Seasoning)
2 cups shredded Colby Jack cheese
Instructions:
Brown 2lbs ground beef over medium heat.

Once your meat is browned, add 15 ounces tomato sauce, taco seasoning, and refried beans. I had to substitute a small can of enchilada sauce because I didn't have enough tomato sauce. Cook until completely heated through.


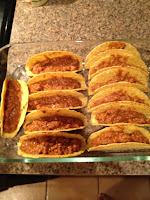
Arrange taco shells in an oven safe dish. I used a 13x9 glass Pyrex dish.

Fill your taco shells with your meat mixture until they are about halfway full. We only used 12 taco shells since we are a small family and had about half of the meat leftover to freeze for a second meal.

Top with cheese and bake at 400 degrees for 10-12 minutes until the cheese is melted. You should have something that looks like this:

This recipe received the stamp of approval from my husband and our two children. Her taco seasoning is very flavorful but not overly spicy and is easily tolerated by my two small children.
Saturday, February 2, 2013
Bacon wrapped jalapeno bites
 I have seen these for years and always wanted to make them. See my previous confession re: my level of cooking knowledge from prior to a few years ago as the main reason why I did not. About a year ago my sister, Jessica, brought these to a holiday celebration at my parent's house and my desire to make them was renewed.
 I will forewarn anyone who is interested in making these: bacon wrapped jalapeno bites are labor intensive. However, they are totally worth it and usually a hit whenever I make them.
Tips:
- I do this process in phases. I do all of the cutting and removing of the seeds first, then move on to the next step, instead of finishing one pepper and moving onto the next one. This stops all your tools from being potentially covered in hot jalapeno juice.
- WASH YOUR HANDS. I repeat WASH YOUR HANDS. Say it with me now: WASH YOUR HANDS. Handling jalapenos and not fully washing your hands ensures that you will touch your eye balls at some point in the near future and you are guaranteed to forget that you didn't wash your hands until your eyes are burning off.
- We use cheap bacon in this recipe and it is just as good as expensive bacon.
- I use aluminum foil between the broiler pan and the drip pan to ensure easy clean up. If you like spending time scrubbing greasy pans after you eat, then you can omit this step.
- I use a soup spoon to remove the seeds and ribs in one fail swoop instead of using my fingers. This doesn't stop the juice from squirting in your face so beware.
- These are equally as good the next day - cold is ok too according to my husband.
- The peppers that I used in these photos were on steroids - normally 4 ozs of cream cheese will be more than enough for 8 peppers. Adjust accordingly.

Don't use the same spoon to fill your peppers that you used to remove the seeds and the ribs, or wash it thoroughly. You don't want to waste all that time removing the seeds and the ribs of the pepper to put the heat back in by getting the jalapeno juice in the cheese mixture.
Bacon wrapped jalapeno bites
Ingredients:
 8 whole jalapeno peppers8 ozs cream cheese, softened
1/2 cup grated cheddar cheese
8 strips of bacon
Preheat over to 425 degrees F. Prepare your pans by putting aluminum foil over your drip pan and heavily spraying your broiler pan with cooking spray.


Cut the stems off your jalapenos, cut them in half and de-seed each half.


Mix together all cheese and use a clean spoon to fill each half with cheese mixture.

It should look like this once fully incorporated.

And you should have something that resembles this once your peppers are finished being filled with the cheese. Resist the urge to eat immediately. They will get even better, because everything is better with bacon!

Cut bacon strips in half and wrap each jalapeno half with one half of a piece of bacon. Place on a broiler pan with a drip pan underneath.


-Sara
Sunday, January 13, 2013
Cheesey Chicken Spaghetti recipe
A few observations for a Sunday:
First, Sunday comes WAY too early in my weekend. It feels like yesterday was Thursday and here I am back to dreading going back to work tomorrow. How does this happen?
Second, Lemonade Vitamin Water Zero rocks my world...until I saw the ingredient list... It's supposed to be a water substitute - why does it have ingredients that I can't pronounce?
Third, when my children don't get their scheduled naps, being a mom who drinks wine out of a sippy cup and pops pain pills doesn't seem so bad. Silas missed enough of his normal nap(s) today that he fell asleep during dinner tonight. Big problem. Anyone who has had to wake up a child like that knows the Hell and torture that is to come until you can get that child back to sleep. Luckily, he loves sleep like Corry and I do so he was right back to sleep after his bath and a bottle.
Today was supposed to be productive. I had an unstated to do list that was mostly done. There were several items that had to get done:
1. Section out that bacon and ground beef that I bought yesterday and get that in the freezer.
2. Do at least a few loads of laundry.
3. Make at least one freezer meal.
Chicken spaghetti it is. This recipe was adapted from the Pioneer Woman's awesome chicken spaghetti. Sometimes I will go back and make hers but usually I tweak it to our family's interests. We have recently discovered roasting our own Poblano chiles and so we include a sizeable amount of those in our adaptation.
Cheesey Chicken Spaghetti
 3 cups cooked spaghetti - broken in half
2 chicken breasts - cooked and cubed
2 cans cream of "something" soup - you can use your favorite mixture of mushroom, cheddar cheese, or chicken)
1 cup chicken broth
1 jar diced pimentos, drained
1 small onion - diced
roasted poblano peppers to taste - we used two whole peppers this time and it was a bit spicy
1.5 tablespoons seasoning salt
1/8 tsp cayenne pepper
salt and pepper to taste
2.5 cups shredded cheese - we Colby Jack but have previously used cheddar/mozarella blend
-Preheat oven to 350 degrees. Grease a 13x9 pan and set aside.
-Cook chicken until done then cube. We boil on the stove. Place in large mixing bowl.
-Add salt to same water used to boil chicken and cook broken pasta according to directions on package. Drain and put in same bowl with the chicken.
-Add both cans of soup. Normally we use one cheddar cheese and one cream of chicken but we have also used one cream of mushroom instead of cheddar cheese soup and it turned out great as well.
-Add your broth, pimentos, onion, peppers, seasoning salt, cayenne, salt, pepper and shredded cheese to the pasta and chicken mixture. Stir until well combined.
-Pour into greased 13x9 pan and place in over for 45 minutes or until bubbly around the edges. Allow to set for at least 5-10 minutes before serving.
Let me know how you like it!!

Friday, January 4, 2013
Teething baby + Sick Toddler = awesome day
Silas turned 1 on December 31st. He is my last baby. We will cover the sadness around that subject sometime in the future. For now, let's just say that he is enduring the worst part of baby/toddlerhood - teething. Specifically cutting molars. I have always told someone that if it was possible for babies to cut all of their teeth in like two days, I would much rather that happen. Unfortunately it does not.
We are currently on day 5ish of molars coming in. Let's regress a second and relive our lives months ago when Silas cut his other eight teeth in like two weeks. He gets a fever, is up ALL NIGHT, and just generally a ridiculously cranky baby for days. Isabella was never a problem with teething. No fighting, no crying, no whining or anything. We always attributed it to the amber teething necklace that she wore. I have told my husband that we should have Silas look like Mr. T with so many amber necklaces to combat his teething. We have one on him that he has worn solid since he was about 2 months. Please don't judge - I am the worst amber owner ever. I don't take it off of them ever... I don't wash it... I don't sun it... he just wears it. I am currently researching how I should go about washing it but I am kind of afraid to remove it because of how he will react. Currently he doesn't even seem to notice it and I don't want to draw attention to it in any form or fashion.
So, we are on about 5 days of not sleeping for Silas, me and my husband. Needless to say our house is in an awesome mood. Because the universe sometimes likes to throw all kinds of fun at you at the same time, Isabella woke up this morning and said that her ear was hurting. I got instantly anxious because she has had HORRIBLE double ear infections before and not said anything about pain. After a doctor appointment for the both of them it is determined to be nothing serious except teething for cranky baby, ear infection for Isabella and totally shot day for mommy.
Today is the day before Silas's first birthday party. I have a million and one things to do. I am finally getting a second to breathe after making a cake from scratch, cake balls, prepped fruit salad, prepper the dip for tomorrow, cleaned the kitchen, made the banners and got as much prepped as possible for the food tomorrow. I hope to be able to take some pictures and post them tomorrow. For now, I am going to pass out while the second cake cooks.
-Sara
We are currently on day 5ish of molars coming in. Let's regress a second and relive our lives months ago when Silas cut his other eight teeth in like two weeks. He gets a fever, is up ALL NIGHT, and just generally a ridiculously cranky baby for days. Isabella was never a problem with teething. No fighting, no crying, no whining or anything. We always attributed it to the amber teething necklace that she wore. I have told my husband that we should have Silas look like Mr. T with so many amber necklaces to combat his teething. We have one on him that he has worn solid since he was about 2 months. Please don't judge - I am the worst amber owner ever. I don't take it off of them ever... I don't wash it... I don't sun it... he just wears it. I am currently researching how I should go about washing it but I am kind of afraid to remove it because of how he will react. Currently he doesn't even seem to notice it and I don't want to draw attention to it in any form or fashion.
So, we are on about 5 days of not sleeping for Silas, me and my husband. Needless to say our house is in an awesome mood. Because the universe sometimes likes to throw all kinds of fun at you at the same time, Isabella woke up this morning and said that her ear was hurting. I got instantly anxious because she has had HORRIBLE double ear infections before and not said anything about pain. After a doctor appointment for the both of them it is determined to be nothing serious except teething for cranky baby, ear infection for Isabella and totally shot day for mommy.
Today is the day before Silas's first birthday party. I have a million and one things to do. I am finally getting a second to breathe after making a cake from scratch, cake balls, prepped fruit salad, prepper the dip for tomorrow, cleaned the kitchen, made the banners and got as much prepped as possible for the food tomorrow. I hope to be able to take some pictures and post them tomorrow. For now, I am going to pass out while the second cake cooks.
-Sara
Thursday, January 3, 2013
52 in 52 Pinterest Project #1 - Overnight Apple Cinnamon Oatmeal
Pinterest project - 1
Pinterest projects to go - 51
I am always on the look for a breakfast recipe that I can "cook" overnight. This has been my second failure so perhaps the universe is trying to tell me something.
I was perusing Pinterest the other day and came across this pin for overnight apple cinnamon Oatmeal - original website/recipe found here: http://bestfoodpins.com/archives/7022
Several things immediately struck me with this pin:
1. I LOVE using the crock pot. I had never cooked anything overnight in it, but I figured that there has to be a first time for everything.
2. I LOVE apple cinnamon oatmeal.
3. I had all the ingredients on hand and none of them were "weird" or seemed like they needed to be babysat. I'm not sure if anyone else does this but anytime I read the ingredients to a recipe I always skip over it if it has an odd ingredient or requires too much attention, like stirring constantly for over 10 minutes - who has time for that?
So we begin our journey. I pull out my trusty crock pot, assemble ingredients exactly as stated except that I used steel cut oats - what I had on hand. After an hour I put Saran Wrap over my crockpot under the lid because my pot doesn't seal as well as I would appreciate.
Our one year old crying woke my husband and I up approximately eight and a half hours into cooking time, which should have been fine. Upon opening the lid, the most amazing aroma was released. It smelled like a hot apple pie... *drool*. I spooned it into a container to take to work and my husband took a bite. At this point, even though we have been married 4 years, I wasn't totally sure how he felt about oatmeal, but he didn't seem impressed. He said it needed sugar, which I thought was odd because it seemed like enough while I was putting it together and I used a sweeter apple. I figured that it was just his lack of appreciation for oatmeal and went on to work.
Opening the container while at work, I noticed that the aroma did not travel with me to work, which was disappointing. First bite - it's glue-y. And tasteless. And like wallpaper paste with chunks of apples in it.
I want to cry. My first Pinterest project is a failure! I have had such success with different pins in the past and the first one that I am going to document is a miserable failure. Normally I would try to make it again to see if I could tweak the recipe to obtain a better outcome, but this one seems so hopeless that I don't want to waste the ingredients trying it again. Let's hope that the next 51 have a better outcome.
- Sara
Pinterest projects to go - 51
I am always on the look for a breakfast recipe that I can "cook" overnight. This has been my second failure so perhaps the universe is trying to tell me something.
I was perusing Pinterest the other day and came across this pin for overnight apple cinnamon Oatmeal - original website/recipe found here: http://bestfoodpins.com/archives/7022
Several things immediately struck me with this pin:
1. I LOVE using the crock pot. I had never cooked anything overnight in it, but I figured that there has to be a first time for everything.
2. I LOVE apple cinnamon oatmeal.
3. I had all the ingredients on hand and none of them were "weird" or seemed like they needed to be babysat. I'm not sure if anyone else does this but anytime I read the ingredients to a recipe I always skip over it if it has an odd ingredient or requires too much attention, like stirring constantly for over 10 minutes - who has time for that?
So we begin our journey. I pull out my trusty crock pot, assemble ingredients exactly as stated except that I used steel cut oats - what I had on hand. After an hour I put Saran Wrap over my crockpot under the lid because my pot doesn't seal as well as I would appreciate.
Our one year old crying woke my husband and I up approximately eight and a half hours into cooking time, which should have been fine. Upon opening the lid, the most amazing aroma was released. It smelled like a hot apple pie... *drool*. I spooned it into a container to take to work and my husband took a bite. At this point, even though we have been married 4 years, I wasn't totally sure how he felt about oatmeal, but he didn't seem impressed. He said it needed sugar, which I thought was odd because it seemed like enough while I was putting it together and I used a sweeter apple. I figured that it was just his lack of appreciation for oatmeal and went on to work.
Opening the container while at work, I noticed that the aroma did not travel with me to work, which was disappointing. First bite - it's glue-y. And tasteless. And like wallpaper paste with chunks of apples in it.
I want to cry. My first Pinterest project is a failure! I have had such success with different pins in the past and the first one that I am going to document is a miserable failure. Normally I would try to make it again to see if I could tweak the recipe to obtain a better outcome, but this one seems so hopeless that I don't want to waste the ingredients trying it again. Let's hope that the next 51 have a better outcome.
- Sara
Wednesday, January 2, 2013
52 in 52
Pinterest. Simultaneously upon hearing that word most men groan and roll their eyes and most women get instantly antsy wanting to tell you about something awesome that they say on that website the other day. I have to admit that the months following my discovering this site my mother and my sisters could be heard uttering the words 'I saw the coolest thing the other day on Pinterest'. Who am I kidding - we still do this...
I am a self proclaimed Pinterest lover. It really is addicting and, at times, overwhelming. It's easy to get into the black hole of pinning a ton of awesome projects, yummy recipes and cute ideas and never doing anything about it. I actually do what I can "Pinterest projects" right now, whether that be crafts or recipes, but one of my resolutions is to do that more.
I was inspired by Youtube mommy vlogger dreamflight6000 Amy. She is an awesome mom to two young children who has made a few videos where she details making and reviewing a recipe that she has found to be popular from Pinterest. It has been informative, inspirational, at times hilarious, and definitely amusing
My first pin project has already happened and I am going to spoil it and tell you that it turns out horrible. The idea was so awesome, but the end result was something that I wouldn't even feed to the dogs. More details tomorrow...
I am a self proclaimed Pinterest lover. It really is addicting and, at times, overwhelming. It's easy to get into the black hole of pinning a ton of awesome projects, yummy recipes and cute ideas and never doing anything about it. I actually do what I can "Pinterest projects" right now, whether that be crafts or recipes, but one of my resolutions is to do that more.
I was inspired by Youtube mommy vlogger dreamflight6000 Amy. She is an awesome mom to two young children who has made a few videos where she details making and reviewing a recipe that she has found to be popular from Pinterest. It has been informative, inspirational, at times hilarious, and definitely amusing
My first pin project has already happened and I am going to spoil it and tell you that it turns out horrible. The idea was so awesome, but the end result was something that I wouldn't even feed to the dogs. More details tomorrow...
Tuesday, January 1, 2013
2013 Resolutions
Ok so one of my 2012 resolutions was to write on this very blog more ... and it failed miserably. This year I am going to take a new approach. In order to accomplish the resolution this year I am going to write every day around the same time. That way it makes it like a job ... a more enjoyable version of a job, I suppose. Here's hoping that I can do it. I am also taking on more than one blog. There are some topics that I would like to discuss or get assistance with that I understand that the general public will not be interested in so I will not bring them here. Once I establish those other blogs I will link them here..
So, my first post will be my 2013 resolutions. They are numerous but should be easy to accomplish. Because I am a list maker, I have organized them into categories. Later in the week, I will detail how I feel that I will accomplish them.
Personal
1. Be more "girl"y, i.e. wear makeup, do my hair, etc.
2. Blog everyday.
3. Go on more dates with my husband.
Home
1. Do 52 "Pinterest" projects for the year.
2. Stock freezer with prepared meals once per month.
3. Create a monthly budget and stick to it.
4. Save more money every month.
5. Do 52 acts of preparedness.
Health
1. Stop drinking sodas.
2. Do some form of exercise 5 days per week.
Once every week or so I will update on my progress. Eventually I hope to have more of a schedule to my blog about what kind of post gets posted on a certain day of the week.
Happy New Year!!
So, my first post will be my 2013 resolutions. They are numerous but should be easy to accomplish. Because I am a list maker, I have organized them into categories. Later in the week, I will detail how I feel that I will accomplish them.
Personal
1. Be more "girl"y, i.e. wear makeup, do my hair, etc.
2. Blog everyday.
3. Go on more dates with my husband.
Home
1. Do 52 "Pinterest" projects for the year.
2. Stock freezer with prepared meals once per month.
3. Create a monthly budget and stick to it.
4. Save more money every month.
5. Do 52 acts of preparedness.
Health
1. Stop drinking sodas.
2. Do some form of exercise 5 days per week.
Once every week or so I will update on my progress. Eventually I hope to have more of a schedule to my blog about what kind of post gets posted on a certain day of the week.
Happy New Year!!
Friday, February 10, 2012
Resolution #2: Utilize the parts of Once a Month Cooking that work for our family
Let's just get it out of the way now and say that I have an unhealthy obsession with Pinterest. If you have ever been on it, you understand - here is my page http://pinterest.com/saraprice/. Feel free to follow. I get on tangents where I pin weird stuff but mostly foods that I want to try, stuff for my children or arts and crafts ideas. Side note: After my few posts about my resolutions I plan to start a daily post of "this is neat" type entries. Mostly from things that I find online or see on Pinterest and want to share with more than my followers. If you haven't been on Pinerest, you could never understand and should join. I will send you an invite, if interested. Now that we got that settled let me also say that this entire idea was found on Pinterest on this woman's blog: http://pregnant.livejournal.com/17071127.html
Let me go back: I have been bugging my husband since we got pregnant with Silas that I would like to do some sort of OAMC (Once a Month Cooking) to start before we had the baby so I wouldn't have to worry about cooking when I was on maternity leave. Based on how Isabella was as a newborn and what I have found to be the case with newborns they are not fun and tend to scream/cry A LOT so I was fairly confident that if I had another "high needs" child that I would be uninterested in my husband coming home from work and having one of those "what do you want for dinner?" conversations. He refused every time to even entertain the idea. There was also a reason... and looking back there was always a good reason. Reason #432 why I love my husband is he sees how we live and is able to be honest about how things will work in the future based off of our past experiences. I have a tendency to have a more rose colored glasses-type review of our past when it comes to making decisions about our future. We, as a couple, have a tendency to buy food at the grocery store with the intentions of cooking and eating at home and, in the past, have still eaten out instead of eating that food at home. He knew that if we spent $200-$300 on food to prep, possibly cook, and freeze that it would end up getting freezer burned or not being eaten until after it's freezer shelf life expired. And he was right... we would have.
Then he found that blog post on Pinterest. Of course, he was on Pinterest on accident looking around for car parts or naked ladies *wink* and not for recipes or anything that the website should be used for. He was instantly enamored with this idea and brought it up to me one night. I will say that our grocery trip cost more and made more portions on some dishes than originally stated but all in all worked out the same. We have made and frozen all dishes except the enchiladas, but have only actually tasted two of them so far so I am not fully comfortable sharing them yet until I taste what was made. Reviews of her recipes and our version of the recipes coming soon.
I tell you all of that to tell you that one of my resolutions this year will be to utilize the parts of OAMC that work for our family. We like having fully cooked, or almost fully cooked meals in the freezer that just have to be warmed up. We like having stew, soup, chili, sauce type meals that you can freeze in freezer bags flat to save space. I like to cook my meals over the course of a few days instead of one big cooking spree. This prolongs the agony, so to speak, but leaves me overall in a better mood and more apt to be a more pleasant person once the meals are cooked. One thing that I will change next time is to do all of the "prep" work the day before, i.e. chopping veggies, browning and portioning out meats, etc as that makes the actual cooking go a lot faster.
Any other tips and tricks from once a month cookers?
Let me go back: I have been bugging my husband since we got pregnant with Silas that I would like to do some sort of OAMC (Once a Month Cooking) to start before we had the baby so I wouldn't have to worry about cooking when I was on maternity leave. Based on how Isabella was as a newborn and what I have found to be the case with newborns they are not fun and tend to scream/cry A LOT so I was fairly confident that if I had another "high needs" child that I would be uninterested in my husband coming home from work and having one of those "what do you want for dinner?" conversations. He refused every time to even entertain the idea. There was also a reason... and looking back there was always a good reason. Reason #432 why I love my husband is he sees how we live and is able to be honest about how things will work in the future based off of our past experiences. I have a tendency to have a more rose colored glasses-type review of our past when it comes to making decisions about our future. We, as a couple, have a tendency to buy food at the grocery store with the intentions of cooking and eating at home and, in the past, have still eaten out instead of eating that food at home. He knew that if we spent $200-$300 on food to prep, possibly cook, and freeze that it would end up getting freezer burned or not being eaten until after it's freezer shelf life expired. And he was right... we would have.
Then he found that blog post on Pinterest. Of course, he was on Pinterest on accident looking around for car parts or naked ladies *wink* and not for recipes or anything that the website should be used for. He was instantly enamored with this idea and brought it up to me one night. I will say that our grocery trip cost more and made more portions on some dishes than originally stated but all in all worked out the same. We have made and frozen all dishes except the enchiladas, but have only actually tasted two of them so far so I am not fully comfortable sharing them yet until I taste what was made. Reviews of her recipes and our version of the recipes coming soon.
I tell you all of that to tell you that one of my resolutions this year will be to utilize the parts of OAMC that work for our family. We like having fully cooked, or almost fully cooked meals in the freezer that just have to be warmed up. We like having stew, soup, chili, sauce type meals that you can freeze in freezer bags flat to save space. I like to cook my meals over the course of a few days instead of one big cooking spree. This prolongs the agony, so to speak, but leaves me overall in a better mood and more apt to be a more pleasant person once the meals are cooked. One thing that I will change next time is to do all of the "prep" work the day before, i.e. chopping veggies, browning and portioning out meats, etc as that makes the actual cooking go a lot faster.
Any other tips and tricks from once a month cookers?
Wednesday, February 8, 2012
Non-resolutions
So I am sure that everyone has experienced this... December 15-ish, if not before, you start to get nervous thinking about your "resolutions" for the following year. Almost everyone will include at least one about "Exercise more" or "Lose x amount of weight". Most people do really well in January, possibly on into February. Gym memberships *and* attendance at said gym are up, I can imagine, like 100 fold in the beginning of the year. Then slowly you start to get busy. You start to make excuses like you are too tired after work. You are too tired before work. You forgot your gym clothes. You took the stairs twice today and that should count as exercise. The next time you think about it a month has gone by, then two months, and then all of a sudden you can't even remember when you saw the inside of the gym yet. You are not alone. You are certainly not the only one who fails at resolutions and goals that they make at the beginning of the year.
Why is it that we fail at goals, wishes and wants for ourselves that we are SO passionate about at one time during the year? Why is it that at the beginning of the year we have so much faith in ourselves and our abilities that we are willing to stake our future year's worth of happiness on the smallest statements? It seems as if we are doomed to fail if we claim those statements as goals that we are interested in achieving. It's like we, as humans, need our subconscious to trick us into achieving these goals by not putting them out there in the open. That, perhaps, we need something like subliminal advertising to help us out with these resolutions as most people during the year will not keep even one of their resolutions. I know that, in the past, most of the time by May I would have forgotten what any of my resolutions were from the beginning of the year.
This year I decided that I wasn't going to participate in this "tradition" of making a decision at the beginning of the year that I was going to fail at throughout the year. Instead, I am reviewing my life now, in February, for little things that I would like to either change or start doing that are manageable, because let's be reasonable... I have a husband... I have 4 children, 2 of which live with me full time and are under 2... I have a full time job that I love enough to want to spend more than 40 hours at... I don't have time for "change the world" type resolutions.
However, I *do* have time for the following resolutions:
Why is it that we fail at goals, wishes and wants for ourselves that we are SO passionate about at one time during the year? Why is it that at the beginning of the year we have so much faith in ourselves and our abilities that we are willing to stake our future year's worth of happiness on the smallest statements? It seems as if we are doomed to fail if we claim those statements as goals that we are interested in achieving. It's like we, as humans, need our subconscious to trick us into achieving these goals by not putting them out there in the open. That, perhaps, we need something like subliminal advertising to help us out with these resolutions as most people during the year will not keep even one of their resolutions. I know that, in the past, most of the time by May I would have forgotten what any of my resolutions were from the beginning of the year.
This year I decided that I wasn't going to participate in this "tradition" of making a decision at the beginning of the year that I was going to fail at throughout the year. Instead, I am reviewing my life now, in February, for little things that I would like to either change or start doing that are manageable, because let's be reasonable... I have a husband... I have 4 children, 2 of which live with me full time and are under 2... I have a full time job that I love enough to want to spend more than 40 hours at... I don't have time for "change the world" type resolutions.
However, I *do* have time for the following resolutions:
- Have more patience today than I did yesterday
- Utilize the parts of Once a Month Cooking that work for our family
- Write a blog post everyday for at least 30 days
- Become a better money saver
Sunday, February 5, 2012
Cooking pumpkins
This year I wanted to do something super special for my awesome husband so I decided to make him a few pumpkin recipes made from "real" pumpkin, not the can stuff. I wasn't sure how to go about doing this but I got A LOT of help from this woman's entries: http://www.pickyourown.org/pumpkinpie.php
I will admit that I didn't fully explain my plans in advance to my husband, so he was a bit surprised when he came home to 8 pumpkins in the kitchen. I will admit that I was originally intimidated with the thought of roasting and using pumpkin in this fashion but it turned out to be a lot easier than I originally imagined. There does need to be a disclaimer here that while the steps of this process are not difficult, they are time consuming and this process is definitely not for everyone. I think that everyone should do it once just to taste the difference between roasting your own pumpkin and using the can stuff. I will also justify that I only used what are called "pie pumpkins" or "sugar pie pumpkins". Supposedly you can use the normal jack-o-lantern pumpkins but I heard that they can be stringy and I didn't want to mess this up. I got my pumpkins for 3 for $5 or 4 for $5 depending on the size and didn't have any issue paying that considering the amount of yield that we received.
Now on with the show. I bought my pumpkins from my local farmers market. I have seen them at my local grocery store but not a lot of them and not consistently. I didn't do any voodoo magic to try and figure out if they were ripe or able to be used. I just picked 8 of them originally. I saw originally because I am mildly ashamed to admit that I repeated this process again a few weeks later and came home with like 15. Because of that shameful behavior there are approximately 40 cups of cooked pumpkin in my freezer right now. If there happens to be a threat of the Apocalypse soon and you need pumpkin, you know where to go.
Below are the steps that I followed. You can adjust to fit your situation.
I will admit that I didn't fully explain my plans in advance to my husband, so he was a bit surprised when he came home to 8 pumpkins in the kitchen. I will admit that I was originally intimidated with the thought of roasting and using pumpkin in this fashion but it turned out to be a lot easier than I originally imagined. There does need to be a disclaimer here that while the steps of this process are not difficult, they are time consuming and this process is definitely not for everyone. I think that everyone should do it once just to taste the difference between roasting your own pumpkin and using the can stuff. I will also justify that I only used what are called "pie pumpkins" or "sugar pie pumpkins". Supposedly you can use the normal jack-o-lantern pumpkins but I heard that they can be stringy and I didn't want to mess this up. I got my pumpkins for 3 for $5 or 4 for $5 depending on the size and didn't have any issue paying that considering the amount of yield that we received.
Now on with the show. I bought my pumpkins from my local farmers market. I have seen them at my local grocery store but not a lot of them and not consistently. I didn't do any voodoo magic to try and figure out if they were ripe or able to be used. I just picked 8 of them originally. I saw originally because I am mildly ashamed to admit that I repeated this process again a few weeks later and came home with like 15. Because of that shameful behavior there are approximately 40 cups of cooked pumpkin in my freezer right now. If there happens to be a threat of the Apocalypse soon and you need pumpkin, you know where to go.
Below are the steps that I followed. You can adjust to fit your situation.
- Wash and dry your pumpkin. Use soap. I just used my dish soap. Since you are not eating this part then it isn't necessary to get it totally spotless - your main focus is to remove dirt, mud, etc.
- Cut the pumpkin in manageable size pieces. I cut mine in half. Actually my husband was very helpful and cut ours in half since they can be quite tough before they are cooked. Think sweet potatoes except like 15 times as big.
- Scoop out all the gunk from the inside. At this point you can separate the seeds and roast them if you would like. I also took great care to remove most of the stringy grossness as I thought that this would help with the pureeing part later.
- Line a baking sheet with parchment paper or aluminum foil and bake on 350 for anywhere from 45 to 60 minutes. The skin of the pumpkin will get brown but don't worry - this will just add more flavor to your puree. You are looking for the flesh of the pumpkin to be easily penetrated with a fork, knife, etc.
- Once the pumpkin is done, remove from the oven and allow them to cool enough to where you can handle them. The pumpkin will feel just short of 4 billion degrees at this point and I have burned myself multiple times trying to rush this step. Normally I wait 10-15 minutes because I still want it to be warm but you could allow the pumpkins to completely cool and still be fine.
- Scoop out all the flesh of the pumpkins into a food processor and puree until smooth. This will not take that long to get it smooth but you will need multiple batches.
- **This step might not be necessary depending on your pumpkin or what you will be cooking.** Pumpkins by nature are watery. Once ours were pureed we put them in a strainer or a cheesecloth and drained off a lot of liquid. I knew that we were going to be baking bread or pies with ours and didn't want too much liquid in either recipe. You will be amazed at how much liquid you can get from pureed pumpkin.
- At this point your pumpkin is ready to be used or frozen. We used our Food Saver machine and saved them in 2-3 cup bags clearly marked with the date and the amount.
Subscribe to:
Posts (Atom)